


Best viewed using:
Internet Explorer
or
Mozilla Firefox


Making trees...continued
A comment about applying the ground foam. You will get the best results if you
sprinkle from above the tree with the trunk facing directly downward. This
will allow the majority of the foam to stick to the branches and not the
trunk. You can then (if desired), repeat wetting with hairspray and turn the
tree upside-down and sprinkle foam from the bottom up to add to the underside
of the branches. It all depends on how much foliage you want to add to your
tree, and where you want it to be. If pieces of foam stick to places you don't
want, simply pick tem off with a pair of fine-pointed tweezers.
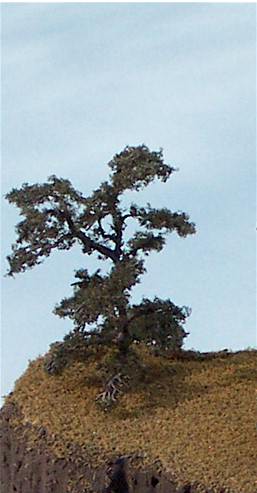
Look again at our old Black Walnut in Figure 14, to the right. You'll see
small clumps of foam on or near the main trunk and large branches. While this
can be overdone, many trees will have new growth popping out in various
places. The trunk and big limbs don't have to be totally free of foliage. In
this case it give the tree some added... character.
- If your tree is to be bare or a dead tree, the procedure will be as follows:
- Select color (or colors) to be applied to the tree. Spraying is recommended for the basic color to be applied. Secondary, or accent colors can be brushed on to the larger areas.
- Inspect overall appearance and perform touch-up as required.
- Spray overall tree with Krylon Dulling Spray (or Testors Dulcote) and allow to dry thoroughly for several hours).
- Your done!
- If you plan to apply ground foam foliage, the procedure will be as follows:
- Wet the branch and limb outer portions with hairspray.
- While still wet, sprinkle on ground foam. Catch excess in plastic dish.
- Inspect and pick-off unwanted foam, or re-spray and add additional foam.
- Re-inspect and repeat above as required.
- Allow hairspray to dry (5-10 minutes).
- Inspect overall tree limbs, branches and trunk for shiny spots (brass showing through) and touch-up paint as required.
- Spray overall tree and foliage with Krylon Dulling Spray (or Testors Dulcote) and allow to dry thoroughly (several hours).
- You're done!
This completes the process of making trees using our Photo-etched Bare Tree Frames. We believe these products will advance realism in scenery to a level this hobby has not seen before, and hope they energize your creativity as much as they do ours.
Special thanks again to John McCarthy, for his patience, assistance, and the terrific examples he provided.
- If you wish to use etched foliage, we recommend using our NS041 (35-foot) Bare Tree Frames, or applying it to either plastic tree armatures or armatures made from wood cuttings. The reason is that the highly detailed etched foliage already contains many small branches and attaching them to our NS038, NS039, or NS040 Bare Tree Frames would hide much of the smaller tree frames branch work. For application of the etched foliage, please refer to the How to... links next to each of those products, or click here
Figure 14
© 2008 Ngineering