|


Best viewed using:
Internet Explorer
or
Mozilla Firefox

 |
Working with Photo-etched Foliage
Pond and Marshland Plants

Figure 1
Painting our etched foliage is quite
straightforward but varies slightly with the type of foliage. All etched foliage
should be completely primer spray painted first, then "color" painted. For
primer, a medium gray, such as Krylon All-purpose Gray Primer #1318 works
well. For airbrushing, an acrylic light to medium gray primer is recommended.
-
The Pond and Marshland Plants fret
contains a variety of plant life, so various colors will be needed to simulate
realism.
-
The Ivy/Grape Stems & Leaves fret can
be painted with a single color, but we recommend at least two.
-
Tree foliage: Sycamore/Maple, Weeping
Willow and Oak Branches with Leaves can also be painted a single color, but
again we suggest at least two. More, in an autumn setting.
Below, we'll cover painting each of the three general types in greater detail.
In each case, our recommendation is to perform the majority of the painting
while the fret is still fully assembled (or in sub-sections that are intact).
It is much easier to paint the tiny components, remove them, assemble them,
then do touch-up; than trying to paint them individually. The first step is to
primer paint the entire fret. The parts on the fret have a front-side and a
back-side (which is obvious). However, from a painting standpoint, the less
obvious edges are most important. If not completely painted, these tiny
shiny brass edges will become really obvious and detract big-time from the
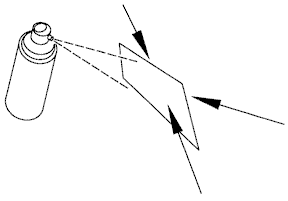
realism you're trying to achieve. We suggest primer spraying each fret as
shown in Figure 1, to ensure the edges, as well as the front and back surfaces
get covered. Avoid spraying on too much paint. Keep the spray can at
sufficient distance to cover evenly and thoroughly, but not a heavy
coat. Allow the primed fret to dry thoroughly (overnight is good).
This fret has 2 sub-sections of different plant life which is repeated 8 times
on the entire fret (for a total of 16 sub-sections). Unless you will be
modeling seasonal changes, we'll assume all of the fret to contain actively
growing plants (not dead or dying), in other words, green. If you plan to use
part of the fret for browning or dead plant matter, you may wish to either cut
out that section, or mask it for painting later. If you choose to mask a
section of the fret, keep in mind the very flexible (fragile) nature of the
individual thin brass plants. We strongly suggest a cut piece of paper to
cover the area to be protected with any taping restricted to only the fret
edges (and only a tiny amount of tape). If you place tape over the individual parts, you will probably destroy
them when removing the tape.
There are several different ways you
can apply color to the Pond and Marshland Plants. Which approach you use depends
entirely on how much time you wish to spend and the level of detail you need to
achieve.
-
Since the fret (or section you're
working with) is primed and thoroughly dry, you may choose to cut those plants
you'll be working with from the fret, install them in your scene and brush paint
them the colors of your choice. This method works OK if you only need a very
small amount of plant life for a particular setting and will be doing more
later.
-
A variation on number 1, is to brush
paint the plants you will be using, then cut them from the fret and install
them, and touch-up and light nicks or scrapes. This method may be easier for
some because the fret is a nice holding fixture while you're brush painting.
-
If you will be using a large quantity
of plants, spray the entire fret a "base" color (the basic green chosen, over
which other shades and colors will be added) and allow to dry thoroughly.
Add additional coloring by brush painting as required. This can be done either
before, or after parts are removed from the fret. Don't forget to inspect and
touch-up after installation.
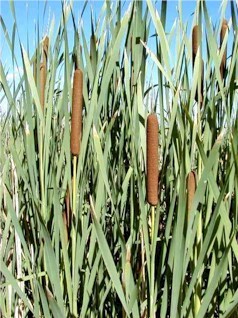
Figure 2 show a typical group of Bullrushes (Cattails). Using lighter and
paler greens such as the colors in this picture will allow the photo-etched
versions to show up well against darker pond and marsh colors. Shade variation
in color adds interesting detail and depth.

Figure 2
When cutting the plants from the fret, always remember to cut the thinnest,
most fragile connection first, working your way up to the thickest connection,
last. This will minimize damage to the part.
Since we'll be working with etched parts in brass frets, the same basic work
area preparation will apply as is outlined in the How to links for our other
Photo-etched Products. Most of the same cutting and bending hand tools will be
used.
Attach these plants using a tiny dab of gap-filling CA adhesive. If after the
adhesive dries there is a shiny spot, add a small dab of Model Masters Flat
Acrylic Clear paint, and the shine will totally disappear.
|


