


Best viewed using:
Internet Explorer
or
Mozilla Firefox


Expanded (up to 24 or more LEDs) wiring for the LED Power Distribution Jr.
As stated on our Board Layout page, the N8105 will allow up to 4 series-wired LEDs on side A of the board. This quantity is based on the assumption that an 18-volt power supply is used and the LEDs are of the white "family" (white, incandescent, yellow-white, warm-white, sunny-white) which typically have device voltages of 3.3 volts DC. The current source on side A takes 5-volts for normal operation, leaving the remaining power supply voltage for the connected LEDs (4 LEDs times 3.3-volts = 13.2 volts).
We also show that an additional 4 LEDs can be wired with resistors, directly to side B and be either series groups or individual (parallel wired) LEDs.
However...
For side B (only) there is an additional way LEDs can be connected that can greatly expand the board's capability (up to a total of 20 or more LEDs). This is accomplished by connecting series groups to the board with the series connections between the LEDs (daisy-chain wiring) off board, then connecting the anode of the first LED in the series group to the 'A' anode solder pad and the last cathode in the group to the 'C' cathode solder pad.
Since there are 4 solder pad pairs, each with resistor placement pads and cathode grounding bridge-pads on side B, each solder pad pair can be a series group connection point. The actual quantity of LEDs in the group is only limited by the voltage of the power source and the combined device voltages of the LEDs in the group. Remember, in series, you add the device voltages of the LEDs together and use that value when calculating resistor requirements. If review of the series-wired calculations is needed, it can be found here.
When using an 18-volt power supply:
Up to 5 white "family" LEDs can be in a series group (3.3 x 5 = 16.5-volts). If all 4 LED positions are used, that's 20 LEDs.
Up to 9 red LEDs (1.85 device voltage) can be in a series group (1.85 x 9 = 16.65-volts). If all 4 LED positions are used, that's 36 LEDs.
Other LED colors have different device voltages so the exact quantity in a given series group may vary. DO NOT mix colors of LEDs in a series group when using a resistor for current control! Bad things can happen due to variations in the LED's internal resistances.
LED colors CAN be mixed in series groups when using the A side of the board, because the current source IC senses each LED in the series group and provides 20ma to each. Very clever indeed.
When using a 12-volt power supply:
Up to 3 white "family" LEDs can be in a series group (3.3 x 3 = 9.9-volts). If all 4 LED positions are used, that's 12 LEDs.
Up to 6 red LEDs (1.85 volt device voltage) can be in a series group (1.85 x 6 = 11.1-volts). If all 4 LED positions are used, that's 24 LEDs.
Once again, DO NOT mix colors of LEDs in a series group when using a resistor for current control!
Figures 1 shows a typical off-board wired series group. Details are noted by a red circled area and corresponding comments. The corresponding numbers are described below:
1. Shows the anode solder pad for the connection of the first LED anode in the series group.
2. Shows the cathode solder pad for the connection of the last LED cathode in the series group.
3. Shows the placement of a current limiting resistor on the resistor solder pads for the group.
4. Shows the cathode grounding-bridge pads. Apply solder to these 2 pads to bridge them together. This will complete the series group connection to the board.
5. Shows bridging pads to connect on-board cathode connections to anode connections. DO NOT apply solder the these bridge connections when performing off-board series wiring.
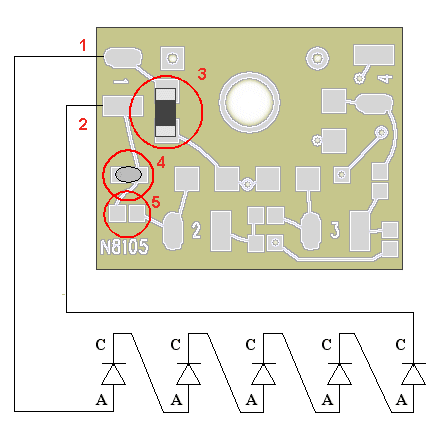
Figure 1
© 2012 Ngineering