


Best viewed using:
Internet Explorer
or
Mozilla Firefox


N8503 Little Bigger Sounds pre-recorded sound effect module for generic external amplifier
Sound board
overview:
-
The N8503 is a digital, 16-bit pre-recorded sound effect module using a high-speed audio processor & 32M-bit serial flash memory..
-
On-board voltage regulation to allow DC input power from 7 to 20 volts.
-
On-board input voltage reverse polarity protection.
-
Sound module is 1.38” x 0.60”.
-
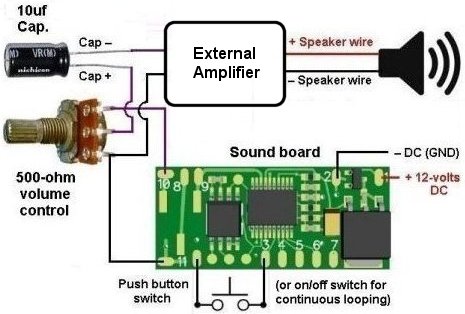
Sound board is configured for (DAC) output for typical (generic) external amplifier
-
The external volume control with knob and the 10uf filter capacitor are included in the sound module package.
Important notes:
A
low-wattage
iron with a pointed tip should be used for all
connection of wires. Too much heat or
solder can damage the wires or module and void the warranty.
We
strongly recommend
that all wires and the appropriate solder
pads on the module be pre-tinned prior to attaching wires to the module.
Relatively speaking, our sound modules are fairly small at 1-3/8" x 5/8". The tiny gold-plated solder pads to which wires (Included in package) need to be attached are approximately 1/16" wide by less that 1/8" long. Two of these pads (DC+ input & Start control Pad #3) are very sensitive to excessive heat during the soldering process.
For many hobbyists that have experience with DCC decoder installations and other small circuit soldering jobs, attaching these wires will not be a problem because they have proper low-temperature soldering equipment and practiced skills to do the job.
However... for some, especially those who model in the larger scales or do not have much experience with small soldering techniques, we offer (at a small additional cost) a wire attachment service including a full visual inspection and testing before shipment. If this is of interest, a link to that service can be found HERE.
Connecting the
Sound board & Amplifier:
The modules tiny sizes and thin construction will allow them to be placed so they are easily hidden from view. Both modules only have circuitry on the board top side. The bottom of the boards can be used for mounting with the small square double-sided sticky foam pads that are included in the product package.
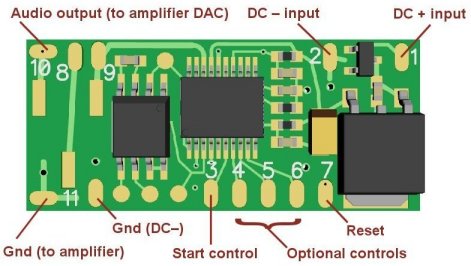
Also included are nine 6” lengths of #32 insulated wire (2 red, 1 blue, 2 violet & 4 black). These can be used for power, control & sound to amplifier wires. One of the red wires can be soldered to the DC+ Input pad & one of the blacks to the DC– pad. The blue wire can be connected to the Start control (pad 3, see figure above) and one of the black wires to a Gnd (DC–) pad. One violet wire can connect the DAC sound board output to one side of the volume control potentiometer. The other violet wire connects from the volume control center (wiper) pin to the + side of the 10uf filter capacitor. The minus (–) side of the capacitor connects to the + input of the amplifier. The last black wire connects from the grounded side of the volume control to the minus (ground) input of the amplifier.
Note: Most amplifiers have either an RCA type input socket, banana plug socket or a DIN connector for audio input. The center connection is the "+" and the outer connection is the ground (–).
Sound Effect tag:
Included in
the product package is a small tag
(the small sheet with the barcode)
indicating the name of the sound effect programmed on the module, the type of
start control(s)
available
for the effect, and control pad
connections & effect playback details.
The standard Little Sound module is pre-recorded with a single sound effect that
can have a run time, in some cases, as long as 5 minutes. Playback of the effect
is initiated by connecting
ONE of the control pads (pad #3 thru #6) to Gnd (DC–). A blue
and/or black wire (included) can be connected to GND (pad #11) for this
purpose.
Playback once:
This type of start control initiates playback when
the
appropriate
Start Control Pad
is momentarily shorted (connected) to Gnd (pad 11). Playback will run through
the entire length of the sound effect, then stop. A push-button type switch of
reed switch energized by a magnet is best suited for this type of control.
Continuously
loop playback:
This type of
start control will initiate playback, then continuously loop from the end of the
effect to the beginning again, as long as the appropriate Start
Control Pad
remains connected to Gnd (pad #11). This can be useful for unattended displays
that require a continuous sound effect. A toggle type switch (on-off) is best
for this control.
On/Off (start
& stop playback):
This type of
start control initiates play whenever the appropriate Start Control
Pad
is connected to pad
#11, but immediately stops playback when the connection is broken. This
is a useful control method for effects that are synchronized to other features,
such as trains entering or leaving a grade crossing and the associated crossing
bell sound. Motion sensors and block control devices can initiate this control.
Multiple sound effects:
Little Sound
modules can be custom programmed (for a very nominal fee) at a customer’s
request. In some cases, it may be desirable to
have more than a single sound effect programmed on a module. The N8301
has a total of 4 Start Control Pads (3 thru 6) that can be used
to initiate the start of up to four total sound effects. In this mode,
selecting (shorting to Gnd) either pad 3, 4, 5, or 6 will start the effect
associated with that choice. The only limitation is that the
total playback time of all effects cannot exceed 5 minutes.
Ngineering can also program customer supplied sound effect files into our
Little Sound modules (again, for a nominal fee). See our website for details.
Start control
can be performed using many different types of switches: Push-buttons, toggle
switches, DCC decoder functions, and
magnetic reed switches, to name a few.
The above information is included in the instruction sheet with each product
Reset control:/span>
Pad #7 can be shorted to Gnd to halt sound playback and reset all controls.
Getting the most out of the speaker:
Without going into too much (boring) detail,
a bit of technical info should be helpful.
Speakers create sound by rapidly moving their speaker cone which moves / vibrates the air in front of them (or behind), creating the sound that we hear. Inside the speaker is a small coil of wire attached to the base of the cone and positioned inside a magnet. Electricity produced/span> by the sound module running through the coil causes this coil to vibrate which vibrates the speaker cone. Viola - sound! However… there’s a catch…
Speakers have a front side… and a back. When the speaker cone is rapidly moving in and out to produce sound out of the front, it is also doing the same thing out the back side. Unfortunately, when one side is pushing air the other side is “pulling” air. This effect on the air surrounding the speaker has a self-cancelling effect known as being “out-of-phase”. Simply put: “Nature abhors a vacuum”. The air pulling effect tries to “reach around” the speaker and grab the air being pushed on the front side. The result is greatly reduced sound output from the speaker.
The solution: A speaker enclosure!
A small speaker “box” that “captures” the sound coming out of either the front
or back of the speaker will eliminate this problem and the amount of sound
volume and tonal quality of the sound will be
dramatically improved. The “box” should be the size (length and width,
or diameter) of the speaker, at minimum with an opening that the speaker can fit
in or the speaker cone can fit over. It can be made of any fairly rigid material
(styrene, etc.) and can be whatever size (length, width, height) that is
available for your project.
A somewhat larger box will help with the deeper
sounds the effect may have. The included speaker has double-sided tape for easy
mounting
![]()
© 2020 Ngineering