


Best viewed using:
Internet Explorer
or
Mozilla Firefox


Pre-wired NK8047L & NK8047BL Campfire, Woodstove & Firerplace Kits
Utilizing the industry’s smallest microcontroller and associated voltage control circuitry, these modules with LED, consume less than 20 ma. This makes all of the NK8047L and BL Kits well suited for any well-filtered and regulated DC power source with an output of 6-18VDC. The very small overall size of this module will allow it to be easily placed in and around any structure.
Connecting theNK8047L and NK8047BL:
Installing the NK8047L or N8047BL is very straightforward. Because the module has circuitry on both sides, care must be taken to be sure that the components or wire solder points will not make contact with any metal object which could cause a short
This kit is pre-wired with
input power wires already connected. The red wire is for connection to +DC and
the black wire is for connection to –DC (ground). These wires are pre-tinned for
easy soldering to your power source.
Figure 1 below shows a close-up of the circuit and wiring connections. Point 3 &
4 are the outputs that connect to the attached LEDs with approximately 6 inches
of very tiny #38 insulated wire. Care must be taken not to kink these
wires during installation
Important note:
A low-wattage iron with a pointed tip should be used for connection of wires. Too much heat or solder can easily damage the wires.The NK8047L and NK8047BL includes the addition of a latching function that starts the lighting effect by grounding the violet wire connected to pin 6 and is timed to start the N8301-084 or N8501-084 or N8502-084 Campfire sound effect (sold separately). See Fighre 1 below.
If the sound module being used is a N8301-084 (Little
Sounds without the external amplifier) the connections wound be the same between
the sound board and the welding Simulator.
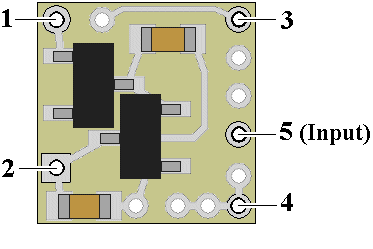
Figure 1
This grounding can be easily achieved by simply connecting (thru a push button) to a common –DC power connection. An example of this is shown in Figure 2 below. In this example, the N8501-084 (Little Bigger Sounds) version of the sound effect is shown.

Figure 2
The LEDs
included with this kit will provide sufficient brightness for a realistic
effect. The brightest light output will be seen from the front of the LED
surfaces, but these LEDs do also have relatively bright “side-shine” allowing
good viewing over a horizontal angle of up to 150 degrees. Plan the positioning
of the LED in your model to “point” them toward the middle of the viewing angle
for best effect.
We recommend mounting the LED from the back by
attaching adhesive to the wires near the back of the LEDs so adhesive is
not placed directly on the LED. It is also recommended that whatever
adhesive is used that it does not contain high aggressive solvents that
could attack the insulation on the wires. Walthers Goo is an example of
an “aggressive” solvent type adhesive. Elmers white Glue, CA (superglue)
and 2-part epoxies are very safe for this type of mounting and will not
damage wires or surfaces of your model in most cases.
If the LEDs are to be mounted next to a scale figure such
as a person kneeling while welding, place the LEDs at the point where you wish
to have the arc flicker appear and route the wires away from that position. The
wires are tiny and can be easily hidden. Also, the wires can be painted if
required as long as acrylic paint (non-solvent
paint) is used.
We hope the
added realism it provides enhances your enjoyment of the hobby.
© 2025 Ngineering