


Best viewed using:
Internet Explorer
or
Mozilla Firefox


NK8033 Pre-wired Gyra Light Kit
Product & installation overview:
This Lightning
effect produces an output of varying intensity to simulate the changing shine of
a Gyra Light
for
the LED connected to its outputs (solder points
3 & 4) when power is
applied to the inputs (points
1 & 2). The lighting effect is timed to accurately represent
the slowly rotating beacon in a lighthouse.
Utilizing the industry’s smallest
microcontroller and associated voltage control circuitry, the total module
with LED
consumes less than
20 ma. This
makes the NK8033 well suited
for low power applications such as battery operation but can easily be powered
by any well-filtered and regulated DC power source with an output of 6-18VDC.
The very small overall size of this module will allow it to be easily placed in
and around any structure, even in Z-scale.
Connecting the NK8033:
Installing
the NK8033 is very straightforward. Because the module has circuitry on both sides,
care must be taken to be sure that the components or wire solder points will not make contact with any metal
object which could cause a short
circuit.
This kit is
pre-wired with input power wires already connected. The red wire is for
connection to +DC and the black wire is for connection to –DC (ground). These
wires are pre-tinned for easy soldering
to your power source. Figure 1 below shows a close-up of the circuit and
wiring connections. Point 3 & 4 are the outputs that connect to the attached
LED. All wires are multi-stranded so they are very flexible allowing for easy
routing in the model.
Important
note:
A
low-wattage iron with a pointed tip should be used for connection of wires. Too
much heat or solder can easily damage the wires.
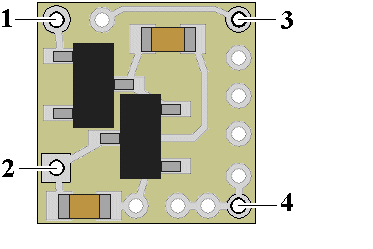
Figure 1
The LED is a
Ngineering N1022C high intensity Incandescent LED. It is quite bright and is
constructed in a 2 X 3mm ceramic housing. Although the main source of light is
out of its face (surface with the orange oval) it produces sufficient side-shine
that it can be mounted facing up and
still project sufficient light from all 4 sides to illuminate the beacon area of
a lighthouse model.
We recommend
mounting the LED from the back by attaching adhesive to the wires near the back
of the LED so adhesive is not placed directly on the LED. It is also recommended
that whatever adhesive is used that it does not contain high aggressive solvents
that could attack the insulation on the wires. Walthers Goo is an example of an
“aggressive” solvent type adhesive. Elmers white Glue, CA (superglue) and 2-part
epoxies are very safe for this type of mounting and will not damage wires or
surfaces of your model in most cases.
If the LED is
to be mounted slightly above a flat surface, we recommend cutting a narrow slot
from the edge of the surface to slide the wires into position where the LED is
to be located. Then gluing the wires min position will be very easy and hold the
LED in place while the adhesive dries.
This completes
hookup of our NK8033
Gyra Light
module. We
hope the added realism it provides enhances your enjoyment of the hobby.
© 2022 Ngineering