


Best viewed using:
Internet Explorer
or
Mozilla Firefox


Working with .005" thick Glass
Cutting the glass to size
-
Since we are dealing with glass here, it's very important to take proper safety precautions:
-
Wear good eye protection.
-
Handle glass with care, edges can be sharp.
-
Use adequate lighting.
-
Good eye magnification is always helpful.
-
Uncluttered work surface to keep track of any stray pieces.
-
Use clean tools.
-
-
Your working surface should be very clean and flat. We like to use the polished marble 1-foot square floor tiles that can be found at your local home improvement center (Home Depot, Lowe's, etc.). We've seen them on sale for as little as $1 to $2 each. If you choose to go this route, inspect them prior to purchase and pick the best you can (unscratched or chipped with minimum pitting). Hint: These are ground and polished to a very flat surface. They work very well for general model assembly where squaring-up parts for bonding is required (i.e.; styrene structures).
-
For the glass cutting process, we recommend placing a clean sheet of paper (colored paper is fine) on the work surface. This provides a slight non-scratching cushion for the glass and helps it stay in place. Holding the paper in place with masking tape can help.
-
For scribing, you'll find that diamond absolutely works the best. There are literally hundreds of small diamond coated tools available in hardware stores, hobby shops, home improvement centers, on the Internet, probably Sears tool section, Ebay, etc.. There are Dremel thin cutting disks (about $6 for an 8-pack with mandrel), scribing tools, cutters, and so on. What you'll want is something small and light-weight.
As an alternate, you can use the broken pieces of Dremel sanding disks. These are typically of carbide/epoxy composition and the broken pieces will have relatively sharp corners which can make a good scribing tool.
-
To scribe the glass, a gentle touch is required. If you're going to scribe a straight line (most common), we recommend using a piece of styrene strip as your straight edge. This, we feel, is a better choice than a steel straight edge for two reasons. First, styrene is relatively soft and has some "give" to it. It won't scratch the glass or chance cracking it as easily as any pressure on a steel object will. We recommend a strip wide and thick enough to maintain straightness but not thicker than, say, .040". Choose a length of about 2" to3".
-
With the glass on the paper, align the styrene straight edge on the glass where you want to scribe. Gently hold down on the styrene, positioning your fingers above, below, and in the center of the glass along the styrene. This helps hold the glass so it won't move while scribing.
-
Lightly drag your scribing tool along the side of the styrene to scribe (scratch) the glass. Too lightly and no scribing will be done, too much pressure and you'll break of move the glass. Too lightly would be a better choice to start with. After you've done this once or twice, you will definitely get a "feel" for what works best for you. Caution: Try not to drag your scribe across the beginning or ending edges of the glass while exerting the downward pressure or you may make small chips on these edges. Try starting and ending you scribing process just at, or slightly inside these edges. When you flex the glass to break it, the fracture will follow your general scribed line. The very small amount at top and bottom that weren't scribed will fracture along the same approximate line. This is much better than unwanted chipping or cracking of the glass.
-
If your fingers are clean and dry (which they should be), pick up the scribed glass by the edges and gently bend it like you would to break a scribed piece of styrene only with a much gentler touch. It will almost instantaneously break along the scribed line.
-
The more you handle the glass, the bigger the chance is that it will get smudged by the oils and dirt trapped in your finger prints. Minimizing handling and careful storage in a clean environment will save you time ultimately. Since we are dealing with glass, you can use most any type of cleaner if required. We've actually used Windex and a small Q-tip on the finished and mounted product with great success.
-
The first time you cut this glass, the results may not come out perfectly to your liking, but like anything else, you will quickly get a "feel" for it. In a very short time you'll be able to repeatable cut tiny sections without any problems.
Bonding .005" thick glass
You can use virtually and bonding agent: CCA, epoxy, rubber cement, Walthers Goo, white glue, etc. Your choice really depends on what you're bonding the glass to and what type of bond you need. If you plan to use this glass where there may be wide variations in temperature (on portable modules containing structures that may be stored in cold, then moved to hot locations), you may want to use a fairly flexible adhesive. This will allow for variations in thermal expansion between glass and the product you're bonding to or the possibility of your product flexing and cracking the glass. However, for the most part, thermal expansion differences probably won't be extreme enough to cause problems. Besides, we've actually cracked a window in one demo example and it looks fantastic! That's not something you can do with clear plastic.
For an HO demo we built, we used extra-thin, instant-cure (1-3 seconds) CCA. We placed the cut glass over the window opening and set a small weight on the center of the glass to hold it in place. Placing a small drop of the CCA on a toothpick tip, we touched the tip to the edge of the glass by the edge of the window opening. Capillary action caused to CCA to "draw" into the point where the glass and styrene window touch. We did this at each corner of the window. In a few seconds, the glass was securely in place. When viewed from the structure front, we could see (under magnification) a very tiny glue-line where the bond exists. This was essentially unnoticeable even under magnification, but at one tiny point a little extra glue was evident on the glass surface. This was easily scraped off without causing any damage or scratching.
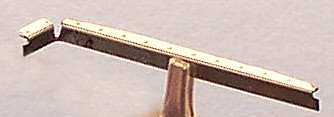
An N-Scale sized glass scraper
Here's a simple little tool that will make cleaning our tiny windows much easier. If you use a wet razor to shave (or know someone who does), it is undoubtedly one of those newer multi-bladed safety razors with the packages of replaceable blades. What we want here is a used blade that we can disassemble to (carefully) remove one of the cutting strips from. These are typically tiny strips of very sharp, very thin stainless steel that are spot welded to a small angled strip. A typical example would be the Gillette Sensor which has two cutting blades. These are held in place in the plastic housing with two small aluminum straps, one at each end of the blade assembly. Any jewelers screwdriver or small pick can be used to pry off these retaining straps. These very sharp blades will then virtually fall out of the plastic housing. We recommend cleaning the blades by soaking them in alcohol and brushing them gently with an old toothbrush to remove shaving residue. This will help reduce the possibility of infection from bacteria should you accidentally nick yourself.
Using a Dremel tool with a sanding disk mounted, use the edge of the disk to cut a small notch on the blade edge about 3/32" to 1/8" from the end. CAUTION: This blade is very sharp. Hold it carefully and securely when grinding and wear good eye protection. Always note the direction of rotation of the sanding disk and contact the part with the disk so that the sanded debris is thrown away from you, not toward your face. The purpose of this small notch is to allow you to bend the end of the blade at 90 degrees to the rest of the blade. This will be your tiny scraper. While you're at it, sand the sharp edge off of the length of the remainder of the blade. That way you can hold onto this portion with you fingers without worrying about getting cut. The bent end of this little tool is a very sharp little scraper that can be used to scrape right up to the edge of a window and remove glue (or paint spatters in the case of our HO lamp demo).
© 2008 Ngineering