Best viewed using:
Internet Explorer
or
Mozilla Firefox
Connecting the N8037 Early-era Flasher Simulator
Installing the N8037 is very straightforward. Because the module has circuitry on both sides, care must be taken to be sure that the components or wires soldered will not make contact with any metal object which could cause a short circuit.
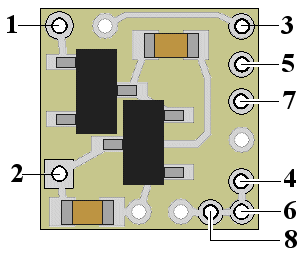
Included with the module are two 6” lengths of #32 insulated wire. If necessary, these can be used for power input wires. If used, we recommend the blue wire be used for the + DC connection. It would be connected to solder point 1 as shown in Fig. 1. This wire could also connect through a switch to the + DC connection for remote control of the lighting effect. The other (green) wire should be connected to – DC and to solder point 2.
Any well regulated DC power source can be used to power this module providing the voltage is at least 6VDC and doesn't exceed 18VDC. Our N3512 and N3518 Power supplies are ideal for this use. Also, due to the very low power consumption, this device can also be powered by a battery, such as a standard 9-volt.

Figure 1
Important note: A low-wattage iron with a pointed tip should be used for connection of wires. Too much heat or solder can easily damage the wires or module and void the warranty.
Also, all connecting wires should be pre-tinned before soldering them to the module. This will make connection quick and easy and ensure excessive heat is not applied to the solder points.
Connecting LEDs
When connecting the LED, proper polarity must be observed. LEDs are “polarity sensitive” and will not function is connected backwards. The N8037 is configured to connect to a 20 ma LED with a device voltage of 1.85-2.0 VDC. This covers all of Ngineering’s Micro and Nano yellow and red LEDs, as well as many of the yellow and red LEDs available.
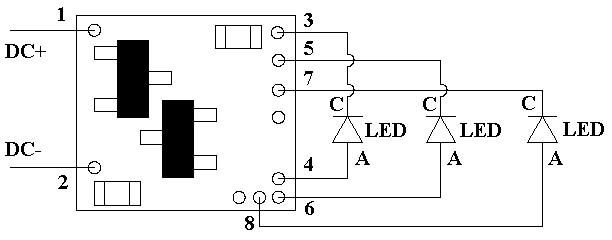
Using wire appropriate for the size of the LED, connect the LED cathode (the – connection) to point #3 on the module and connect the LED anode (the +) to solder point #4.
This module is configured with two (2) additional outputs ports to add extra flashing LEDs. Solder point #5 is the second output and point #7 is the third output. The three outputs (points 3, 5 & 7) are programmed to flash in sequence (3 first, 5 second, and 7 third, then back to 3 starting over). Flash timing on any one output is such that the repetition rate is that of a typical flashing early-era signal or hazard warning light.
If you wish to connect to the additional outputs use the same procedure as noted for solder points 3 & 4 above, only connect using points 5 & 6 and/or points 7 & 8. No additional (external) resistors are required because anode connection points 4, 6 & 8 share a common on-board resistor to protect the LEDs.
For any output, you can substitute a series-wired pair of LEDs if desired (see diagram of our Early-era Alternating Flasher for an example here). By doing this, this module will support a total of up to 6 LEDs. When using a series-wired pair of LEDs, the individual intensity (brightness) of these LEDs will be slightly lower than that of a single LED connected to the same solder points.
Figure 2 below is a schematic layout showing LED connection.

Figure 2
This completes connection of the N8037 Early-era Flasher module. It is recommended that a thorough re-inspection of all connections and module placement be performed prior to applying power. We hope you enjoy the added realism our module provides.
© 2008 Ngineering


