Best viewed using:
Internet Explorer
or
Mozilla Firefox
Connecting the N8080A random 4-LED Simulator
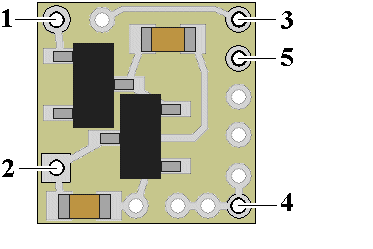
Installing the N8080A is very straightforward. Its tiny size and thin construction will allow it to be placed in many spaces too small for even the smallest Z-scale decoder. Because the module has circuitry on both sides, care must be taken to be sure that the components or wires soldered will not make contact with any metal object (such as a locomotive frame) causing a short circuit.
Included with the module are two 6” lengths of #32 insulated wire. These can be used for power input wires.

Figure 1
Important note: A low-wattage iron with a pointed tip should be used for connection of wires. Too much heat or solder can easily damage the wires, decoder or module and void the warranty.
Also, all connecting wires should be pre-tinned before soldering them to the module. This will make connection quick and easy and ensure excessive heat is not applied to the solder points.
Connecting LEDs
When
connecting the LEDs, proper polarity must be observed. LEDs are “polarity
sensitive” and will not function if connected backwards.
The N8080A
is configured for the connection of
2 series pairs of
20 ma LEDs
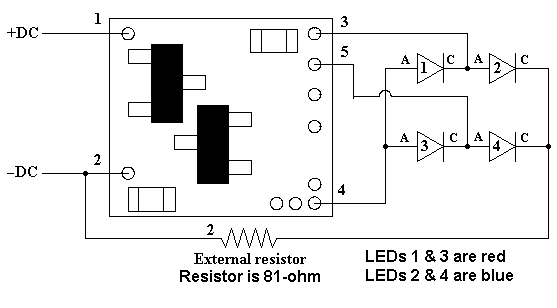
(1 red & 1 blue in each pair as shown in Fig 2 below).
Using wire
appropriate for the size of the LEDs and their placement in your project,
connect the LED anodes (A)
and cathodes (C)
together as shown in Figure 2 below. Note that LEDs 1 & 2 are a series pair
(wired anode to cathode) and LEDs 3 & 4 are a second series pair. Anodes of LEDs
1 & 3 are connected in common to solder point 4. Cathodes of LEDs 2 & 4 are
connected together and in series with an 81-ohm resistor (included with this
packages, plus a spare).
Solder
points 3 & 5 are connected to the cathode/anode junction of each LED pair as
shown below.

Figure 2
This
completes hookup of our N8080A
module. We hope the aded realism it provides enhances your enjoyment of the
hobby.
If you need
assistance or have questions, please contact: nsupport@ngineering.com
For product
warranty details please visit:
www.ngineering.com
© 2025 Ngineering


