


Best viewed using:
Internet Explorer
or
Mozilla Firefox


Connecting the N8103A-1, -2 or -3 Super Booster Board
Our
N8103A-X Super
Booster Boards are
very similar to their little brothers (N8103 Booster Boards) & are available in
3 varieties. They contain components for either a single, dual, or triple
channel output boost. This corresponds to our N803X
Simulators
that are programmed
with either
one,
two or three outputs
plus an optional input control. The
biggest difference is the Super Booster can handle
much more
output current.
Connecting a Simulator to a Booster Board:
Connecting our Simulators to a
Super Booster is very easy. The
board has solder plated holes which correspond to the power input and
output holes located in our Simulators, so alignment and solder connection is
very easy. A length of #26 tinned buss wire is included with each Super
Booster Board for this purpose. Below in Fig. 1 is a typical Simulator with 3
output channels. If it were a single output Simulator we would only be concerned
with one output
hole.
Important note: Not all simulators use the same output holes. It is very important to check the instruction sheet that accompanies each Simulator product for the correct output hole location. For example, our N8034 Ditchlight Simulator uses the upper-right hole (shown below as 3) for input control of the alternating ditchlight effect. LED outputs for that simulator are the next two right-side holes (shown below as 4 and 5). If this Simulator were to be connect to an N8103A-2, 2-channel Super Booster shown in Figure 2, the following hookup would be performed:
Hole 1 on the Simulator goes to hole 1 on the Booster
Hole 2 on the Simulator goes to hole 2 on the Booster
Hole 4 on the Simulator goes to the Booster
I/O - 0
hole
Hole 5 on the Simulator goes to the Booster
I/O - 1
hole
This may seem a bit confusing but it is really quite clear if you always check the product instruction to determine which point (holes are used for LED output.
Note the 5 points (holes) outlined in red. These are +DC connections for LEDs and are not used when a Simulator is connected to a Booster Board. The Booster Board provides all connection points for LEDs.

Figure 1
Figure 2
below,
shows
a N8103A-2
(2 channel)
Super Booster.
Note the holes located inside the rectangle on the left side of the board. These
6
holes match the
6
holes in a Simulator and align with them perfectly when it
is positioned over them.
Important
note:
A N8103A-1
(single channel) Super Booster
will always
use the single hole shown next to I/O –0
for its connection point to a single output Simulator. A N8103A-2
(2 channel) board will always
use the 2 holes positioned next to I/O –0
& -1,
and a N8103A-3
(3 channel) Booster will use I/O –0, -1 & -2.
Unlike our Simulators, these connection points are
fixed.
They correspond to outputs on the right side of the board as follows:
I/O
–0 connects to Booster output 1A (+DC) and 1C (-DC), I/O –1 connects to 2A & 2C,
I/O –2 connects to 3A & 3C. I/O –3 is an INPUT ONLY connection for Simulators
that require some form of input control.
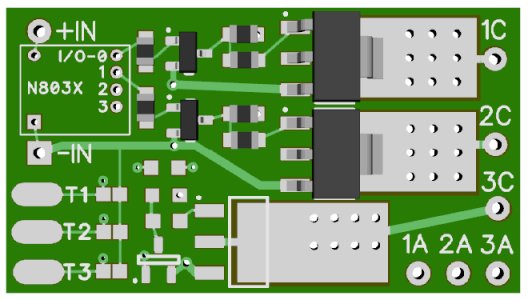
Figure 2
Included with each Booster Board is a length of #26 tinned copper buss wire. Use the following steps to connect the two boards:
-
Cut segments of this wire into 1/2" to 3/4" lengths equal to the number of holes to be interconnected (3 for a single channel board, 4 for a 2-channel, and 5 for a 3-channel board).
-
Lay the Booster Board on a clean flat surface and insert a wire segment into each of the appropriate holes.
-
Using a soldering iron with a pointed tip, carefully solder the wire to the tinned pad surrounding each hole in the Booster Board.
Important note: A low-wattage iron with a pointed tip should be used for connection of these wires. Too much heat or solder can damage the circuit pads on the board and void the warranty.
-
Locate the Simulator board above these wires and carefully guide it down so the wires protrude through the appropriate holes in the Simulator module. As noted above: Not all simulators use the same output holes. It is very important to check the instruction sheet that accompanies each Simulator product for the correct output hole location. We recommend positioning the Simulator no closer than 1/4" to 3/8" above the Booster Board. This will also allow for good air circulation and let the power wires to be connected to the Booster Board more easily.
-
Solder the leads to the appropriate holes in the Simulator Board.
-
Using a small diagonal cutter, snip the excess wire off above each solder joint on the Simulator and on the underside of the Booster if wire is protruding there. This completes connection of a Simulator to a Booster Board.
Figure 3
External
controls for mounted Simulator
Some Simulators require external control to initiate various effects or start
and/or stop timing sequences. In the lower left corner of the Super Booster
there are 3 pads labeled T1, T2 & T3. (see Fig. 4) Connected to each pad is a
pair of solder jumper pads. These oval pads and one side of their associated
solder jumpers are connected to I/O –1, -2 & -3 accordingly. The oval pads are
to provide easy access for soldering wires that might be connected to external
controls such as toggle switches or pushbuttons, instead of having to attach
additional wires to the mounted simulator. If Simulator control is required by
simply grounding (-DC) one of the
I/O points (-1, -2 or –3), then placing a blob of solder to bridge the two
associated pads will do the job.
Also, there may be some Simulators that offer different functions, such as
timing that can be selected by the customer. In this case, the 3 pairs of jumper
pads can offer selectable combinations depending on which pads pairs are bridged
with solder blobs.
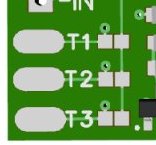
Figure 4
DC
power input connections:
At the
top-left corner of the Super Booster (see Fig. 1) are two larger plated
holes..
The top (round) hole is for the +DC power connection and the lower (square) hole
is for the -DC connection. Any well regulated power supply (or battery) with a
DC voltage of 9-18 volts will power the Booster (and piggybacked Simulator).
Included
in this package
are two 6" lengths of #26 stranded hookup wire (1 red and 1 black). If these are
used for your power hookup, connect the red wire to the +DC and the black to the
-DC.
Voltage
vs. current considerations:
There’s a very old saying: “There’s no such thing as a free lunch”. In electronics, the term Power is used to describe a unit of “work” known as the Watt. Simply put: Wattage equals Voltage times Amperage.
All components in all electronic circuits are defined in part by how much “Power” they can handle. Resistors, LEDs, transistors, capacitors, voltage regulators, etc..
Our N803X Lighting Effects Simulators have up to 3 outputs, with each output capable of 5-volts at 25ma maximum, or 0.125 Watts (1/8th Watt) each (5 x 0.025 = 0.125).
Our Super Booster board has, in its final circuit stage, a large power transistor that can handle up to 1.15 Watts of power. If the Booster has multiple channels, each channel has this large power transistor. That means, depending on power supply voltage, it can handle a proportional amount of current (Amperage) as follows:
With a 6 volt DC supply it can support
191ma of current (over 7 times a simulator output)
9 volt DC supply it can support
128ma with higher output
voltage
12 volt DC supply it can support 96ma
with much higher output voltage
18 volt DC supply it can support 64ma with very much higher output voltage
All of this gets back to our “no free lunch” comment. Current (milliamps - “ma”) carrying capability goes down as supply voltage goes up. This becomes very important in selecting the right power supply for the type of lighting circuit being connected or other devices connected based on their voltage and milliamperage requirements. For LEDs, higher source voltage allows for larger series groups without increasing current draw.
Connecting LEDs to the
Super Booster:
As shown in Figure 2 on page 1, the right side of the Super Booster contains the connection points for LED hookup to the board. Depending on the version of the Booster Board, there will either be 1, 2 or 3 channels that are functional. Below we will cover the various different ways LEDs can be connected to a Booster Board.
We will use a single channel Booster as our example (Figure 5 below), since
connection is the same regardless of which channel(s) or how many are being
used.
Because our Super Booster supports a much higher power capability than our effects Simulators a very wide range of LED connection possibilities exist. A series group or several series groups in parallel can be connected, or many individual LEDs in parallel of various different colors can be connected. Also, one or more high-intensity power LEDs (greater than 20mA) could be connected providing their voltage requirements do not exceed the attached power source's capabilities.
Series wired LEDs:
Our first example will be a simple series group which is probably the most common application and would be the most widely used by hobbyists.
A series group consists of two or more LEDs connected in daisy-chained fashion (anode to cathode, or plus to minus) with a current protection resistor in series with the group. It is highly recommended that a series group contain only LEDs of similar device voltages (same color LEDs). Mixing different device voltages in a series group will yield very unpredictable (and always undesired) results. If a refresher on circuit types would be helpful, it can be found at: http://www.ngineering.com/LED_Circuits.htm.
As we covered in LED Circuits, the primary limiting factor for a series group of LEDs is the sum of their combined device voltages. This must not exceed the DC voltage of the power source being used.
Assume
our single channel
Super Booster
will want to drive 8 of our N1032 Nano red 20mA LEDs. We will be using our N3518
18-volt Power Supply.
Remember that LEDs in series add their device voltages together and as a group the total current stays the same as a single LED (20mA). So, our Nano red LEDs each have device voltages of 1.85-volts x 8 LEDs = 14.8 volts (our 18-volt supply will do fine). Next we determine the resistor needed for the group. If a refresher is needed in this area, see our section on Resistor Usage at http://www.ngineering.com/Resistor_usage.htm. We've determined that calculations require a 160-ohm resistor and it will draw 64mW (.064 watts) of power. Our NA1780 178-ohm 1/8 watt resistor will work fine.
In Figure 5 we see the 8 LEDs connected in series. Note the hole marked C (1C, 2C & 3C) on the Super Booster. This is the cathode connection on the board and the wire coming from the cathode (C) of the last LED in the group should be soldered to it.
If your project is already completed
and
if the series group's resistor is located somewhere else (it cannot be place on
the
Super
Booster), then the
first
LED's
anode
must
be connected through the externally mounted resistor to point
A
on the
Super Booster.

Figure 5
Parallel
groups of Series wired LEDs:
Suppose your particular application requires more LEDs that can be connected in a single string or group due to the voltage limitations of your power supply. In this case, you will need to wire your LEDs in two or more series groups and connect the groups in parallel with each other (each group having its own resistor). For this example, we will assume our power supply will be limited to 9-volts DC and the LEDs we need will be our N1011 Micro white types which have a 3.3-volt device voltage. We want to have 8 LEDs like our last example.
Remember we add device voltages in a series group. Since our power supply will only output 9-volts, we cannot have any more that 2 LEDs in each series group (3 LEDs would = 9.9-volts which exceeds the capability of our power supply). So, we must organize our series groups as 4 groups, each with 2 LEDs and each having its own resistor. We've determined that the resistor needed is 120-ohm and it will draw 48mW (.048 watts) of power. Our NA1210 121-ohm, 1/8-watt resistor will work perfectly.
Figure 6 below shows these series groups connected in parallel to each other, each with their own resistor. In this case, each series group will draw 20mA of current, so the total of the 4 groups will be 80mA. The only concern we need to make sure our 9-volt source can provide at least that much current.
Important note: Figure 6 shows the 4 series groups connected together by a single wire on the cathode side and another single wire on the anode side. In reality, these groups might be wired directly to point A and C on the Booster so that 4 wires (one from each group) connect to the C cathode point, and 4 wires connected to the A anode point. Alternately, they could be connected as shown above with only a single wire attached to the Booster. If this is the approach, that single wire must be able to carry the full 80mA of current or it will overheat. The individual wires that attach from either the LED anodes or cathodes to the single wire only need to carry 20mA.
It is worth noting here that these 4 different series groups could be pairs of 4
different colored LEDs (different device voltages). However, each pair must have
common colors. In this case each series pair's resistor would be a different ohm
value based on the calculation necessary for proper current protection.
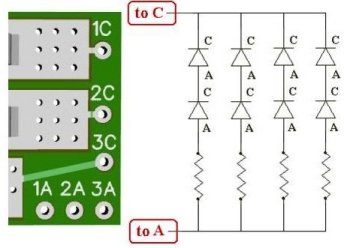
Figure 6
Parallel wired LEDs:
This is very similar to what is shown in Figure 6 except there would only be one LED with its own resistor instead of two. This is a useful approach if single LEDs of different colors (and therefore different device voltages) will be driven by the same Booster channel (and same Simulator effect). In this case you could potentially parallel wire up to 8 LEDs in parallel.
This completes connection of the Booster Board.
© 2018 Ngineering