Secure Site
Shop with
Confidence
![]()
![]()
![]()
![]()
![]()
![]()
![]()
![]()
![]()
![]()
![]()
![]()
![]()
![]()
![]()
![]()
![]()
![]()
![]()
Best viewed using:
Internet Explorer
or
Mozilla Firefox


Constructing a 3-LED Beacon for the N8042 or N8042A Simulator
Construction of the 3-LED Beacon assembly is quite straightforward. Be sure to review proper LED wiring procedures here, here and here before starting, if you need to brush up on your soldering technique. The following construction procedure is also included with each N8042 type Simulator.
When wiring LEDs, proper polarity must be observed. LEDs are “polarity sensitive” and will not function if connected backwards. The N8042 Rotating Beacon Simulator is configured to connect three (3) 20 ma LEDs with device voltages of 2.0 VDC. This covers all of Ngineering’s Micro and Nano yellow LEDs, as well as many yellow LEDs available. The N8042A Simulator is configured to connect three (3) 20 ma LEDs with device voltages of 3.3-3.6 VDC. This covers all of Ngineering’s 2x3, Micro, and Nano white LEDs, as well as many white LEDs available.
Using wire appropriate for the size of the LEDs and its placement in the locomotive, connect a wire to the cathode (C) solder pad on the back of each of 3 LEDs (see Fig. 1).
For N and Z scale, we recommend our Nano LEDs and N5038 #38 magnet wire.
For HO and O scale, we recommend our Micro LEDs and our N5038 #38 magnet wire
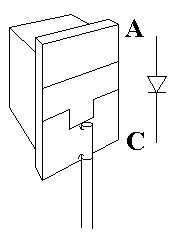
Figure 1
When soldering these wires, make sure they lay flat against the solder pad on each LED as shown and the solder joint is smooth and low (not lumpy). Observe the recommended LED soldering temperature precautions. Remember, a small amount of liquid flux will assist soldering.
The 3 LEDs with wires connected to their cathode solder pads will be positioned standing on end (cathode ends with wires facing downward) in a triangle configuration (120 degrees apart). To facilitate this use a flat piece of styrene or similar plastic with a small hole drilled large enough in diameter to allow the 3 cathode wires to protrude through the hole (a 4th wire will be pushed through the hole for anode connection also). See Fig. 2 below.
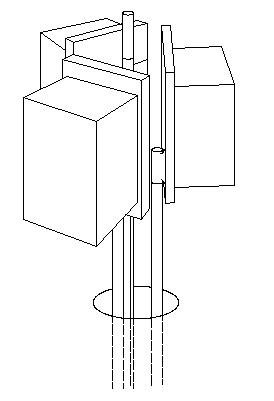
Figure 2
When positioning the 3 LEDs, it may be helpful to brace them in position so they will stay aligned properly. When aligned as shown it is very important that the sides of the LEDs DO NOT touch each other. The gold-plated solder pads on these LEDs extend completely to the edges of the LEDs and will short with each other if contact is made. If necessary, a small shim such as a tiny piece of .005” thick styrene can be positioned between adjacent LEDs to prevent contact. Made sure, if a shim is used, that it does not extend up above the top (anode end) of the LEDs. See Fig 3 for correct LED positioning.
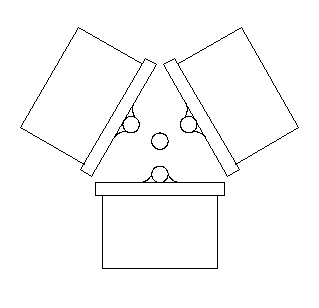
Figure 3
Once the 3 LEDs are securely positioned, slide a pre-tinned wire down through the middle of the LEDs and into the hole below. Position the wire so that the tinned portion does not extend below the anode (upper) solder pads. This will ensure that once soldered in place it cannot short to the 3 cathode connections below.
Place a blob of solder on the tip of the soldering iron and let the blob contact the 3 LED anode ends and the inserted wire at the same time. A very small amount of liquid soldering flux applied sparingly to the LED anode solder pad ends and the tinned wire may facilitate a good (and quick) solder bond. Do not overheat the LEDs in this process. See Fig. 4 below.
An alternate method of performing this solder connection would be to “tack” the anode solder pads of the 3 LEDs together individually at the 3 corners with small solder blobs and then join the tinned wire to one of these blobs. This may be an easier approach for some hobbyists.
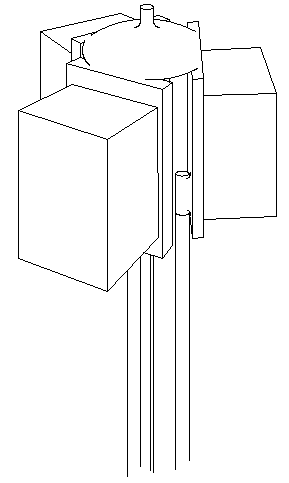
Figure 4
Carefully trim the excess portion of the anode wire that protrudes up from the joining solder blob. This completes assemble of the 3-LED beacon. Carefully remove it from the plastic sheet with hole and test each LED for correct operation. Ngineering’s N8021 LED Tester is an excellent choice for performing the LED testing. Connect the “common” anode wire and one of the 3 cathode wires to the tester. If soldered properly, one of the 3 LEDs should light. Repeat the step switching to the other 2 cathode wires. All 3 LEDs should light individually. If they do, the assembly is now ready for installation into the roof of you locomotive (or where ever it will be mounted). If desired, this top solder joint and the top ends of the 3 LEDs can be painted black to minimize their appearance and improve the overall look of the beacon assembly. Poly Scale Night Black (acrylic paint) is an excellent choice for this purpose.
Carefully thread the 4 wires through the hole you’ve made in your project and align the LEDs as desired. Wiring to the N8042 module is very straightforward. The 3 cathode wires will be connected to the module solder points #3, 4 & 5 (as noted in Connecting the N8042 here). The anode wire is to be connected to solder point #6.
© 2008 Ngineering