


Best viewed using:
Internet Explorer
or
Mozilla Firefox


Punching mounting holes in Lampshades or Escutcheons
This procedure requires the use of a drill press. Any drill press will work as long as the table can be adjusted up and down. No power is needed as it will not be turned on but only used as a very light-duty arbor press.
The first step is dependant on what size hole you intend to punch in you lampshade and/or escutcheon. For our example, we're going to punch a hole in one of our HO 18" shades for mounting to a section of our .018" tubing (scale 1-1/2" conduit in HO). We'll use a #77 drill (.018" diameter) to make the punch.
-
Select a piece of styrene either sheet or strip (if strip at least 1/4" wide) and at least .040" thick. Drill a #77 hole in the styrene using a pin vise by hand, making sure the hole is perpendicular (not at an angle) to the surface. Choose a piece of styrene that is large enough that it can be clamped to the drill press table when the hole drilled is located under the drill press chuck. After drilling the hole, use a scalpel or razor blade to "shave" off any burr that is sticking up.
-
Now, mount the #77 drill backwards (with the shank-end protruding) in the pin vise, leaving roughly 3/8" sticking out of the vise. Using your Dremel tool with a sanding disk mounted, lightly sand the end of the drill bit to make it flat as shown below. Do not deburr or smooth the sharp edge that is created by sanding. This will be your punch. While the shank end of a twist drill is not as hardened as the fluted end, it is still quite tough being made from high-speed steel. This "punch" will last for 75-100 punches through our mild aluminum shades and escutcheons before it needs resharpening. Of course, this drill can be used for normal drilling so we're not sacrificing anything.

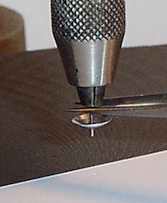
- Mount the pin vise in the drill press chuck and tighten the chuck (do not over tighten). Carefully adjust the drill press table upward so the surface of the table is roughly 3/4" to 1" below the end of the drill shank protruding from the pin vise. Slide the styrene just drilled onto the table and locate the hole just under the drill shank. Carefully lower the drill press handle while adjusting the horizontal position of the hole in the styrene so that the shank enters the hole. Carefully move the handle repeatedly up-and-down checking that the drill doesn't drag or "snag" the edge of the hole.
Most drill presses have a knob that can be tightened to lock the vertical movement of the drill press spindle/chuck. If yours does, lock the spindle in the down position (with the drill shank inside the hole in the styrene). This will "center" the hole on the drill shank while you carefully clamp the styrene in place on the table. Be careful not to allow the clamping to shift the styrene. This will cause sideways stress on the drill shank. Gently release the spindle vertical lock and check that the shank exits and re-enters the hole without dragging.
You're now ready to start punching holes.

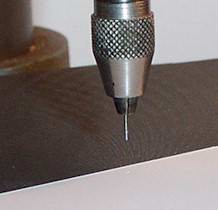
- Select the lampshade or escutcheon that you wish to punch a hole through and place it upside-down on the hole in the styrene. Using tweezers or a toothpick, level the part so that it's not tipped front-to-back or side-to-side. Make sure the part is located on the hole.
- Lower the drill press spindle so that the sharpened drill shank pierces the part. If you've properly aligned the styrene and drill shank, this movement will be clean and smooth. Don't lower the spindle any further than is necessary to pierce the part or the pin vise chuck may damage the part. Return the spindle to it's up position.
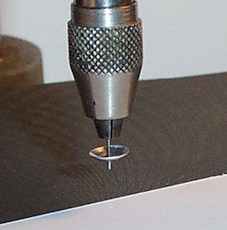
- Using tweezers, gently grasp the drill shank above the part and slide downward. A delicate touch here is important. You may feel some slight initial resistance to movement because the hole in the part and the drill shank are essentially the same size. The part will slide freely from the drill shank, but be gentle, you don't want to damage the part with the tweezers.
-
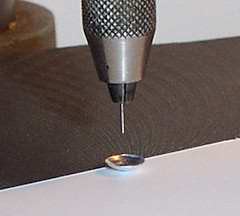
Upon inspection, you will see the part you've just punched has a clean hole with virtually no top-surface burr except for the slight (and very uniform) raised lip which will benefit you when finally bonding this part to the tubing. As you can see, the actual punching operation only takes a few seconds. The majority of time is spent in setup.
-
The final step is to "size" the hole in the part onto a piece of the .018" tubing (or whatever you're make the hole to fit). In our example, the #77 drill is actually about one-half-thousandth (0.0005") smaller than the actual tubing. Placing the punched part in the palm of you hand, gently work a piece of the actual tubing to be used through the hole in the part. Lightly rotating the tubing and slight sideward movement will help. Almost immediately, the tubing will poke through the hole. If you're working with an escutcheon, which will be mounted on the tubing face-side first, you may want the part to be a looser fit on the tube fir easier assembly. If this is the case, you can "wiggle" the part from side-to-side on the tube which will "stretch" the hole a little making it easier to insert the tubing in from the front (convex) side. Again, a gentle touch will produce the results you want.
There you have it. If you plan on making a series of streetlights, or groups of building lights; or may have a club project planned for the future, we recommend putting a label or tape on the styrene used, noting the drill size and other comments so it can be saved as a "tool" for future use (being the pack-rats we are, we tend to save everything). Don't forget to properly clean the parts prior to assembly.
© 2008 Ngineering